UnityShader使用Plane实现翻书效果
之前在网上看到一个Shadr可以实现旋转效果,就拿来实现一个翻书效果。解决办法是用不同模型的显示与隐藏,像序列帧一样,为了实现效果感觉实现起来很繁琐且占用资源,后期优化可考虑用对象池解决。今天就试着用vertex shader来实现一下,互相交流学习,大神勿喷。
实现简单的翻书效果大概需要三步:
1.Plane的扭曲
2.Plane的旋转
3.正反面的采样
Plane的扭曲:
翻书的效果大概是,中间向外突出,X轴方向的正方向会向后偏移。
X轴负方向边沿是保持不动的,且扭曲程度跟随旋转角度增加又减小,90度为最大值。

Plane的旋转:
根据Plane的顶点X的范围(-5,5)
Plane的贴图采样:
用了两个Pass通道来实现,一个是后面剔除,一个是前面剔除。分别对两个图片采样。
下面是Shader
// Upgrade NOTE: replaced 'mul(UNITY_MATRIX_MVP,*)' with 'UnityObjectToClipPos(*)'
Shader "Personal/PageTurning" {
Properties
{
_Color ("Color", Color) = (1,1,1,1)
_MainTex("MainTex",2D)="White"{}
_SecTex("SecTex",2D)="White"{}
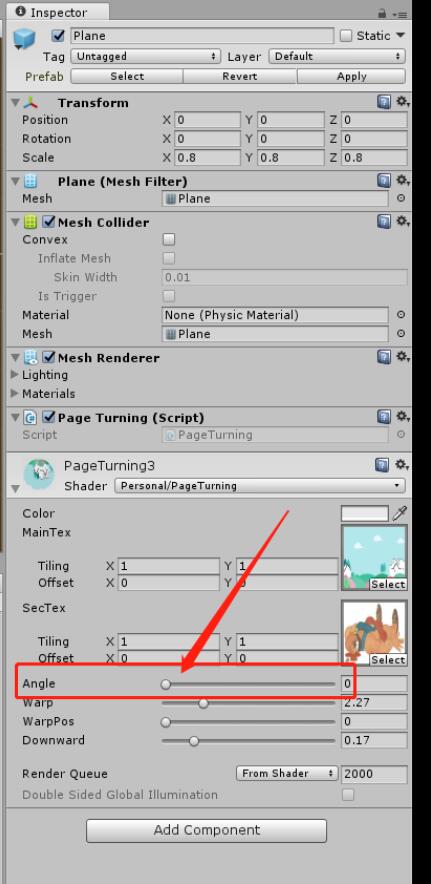
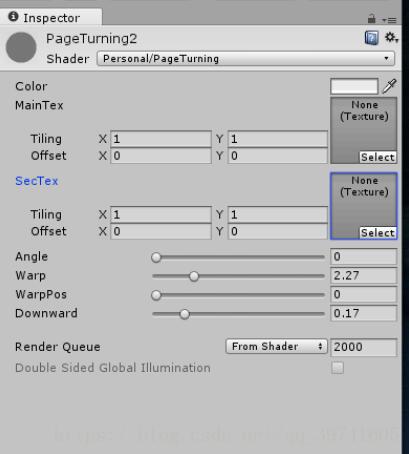
_Angle("Angle",Range(0,180))=0
_Warp("Warp",Range(0,10))=0
_WarpPos("WarpPos",Range(0,1))=0
_Downward("Downward",Range(0,1))=0
}
SubShader
{
pass
{
Cull Back
CGPROGRAM
#pragma vertex vert
#pragma fragment frag
#include "UnityCG.cginc"
struct v2f
{
float4 pos : POSITION;
float2 uv : TEXCOORD0;
};
fixed4 _Color;
float _Angle;
float _Warp;
float _Downward;
float _WarpPos;
sampler2D _MainTex;
float4 _MainTex_ST;
v2f vert(appdata_base v)
{
v2f o;
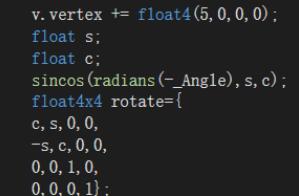
v.vertex += float4(5,0,0,0);
float s;
float c;
sincos(radians(-_Angle),s,c);
float4x4 rotate={
c,s,0,0,
-s,c,0,0,
0,0,1,0,
0,0,0,1};
float rangeF=saturate(1 - abs(90-_Angle)/90);
v.vertex.y += -_Warp*sin(v.vertex.x*0.4-_WarpPos* v.vertex.x)*rangeF;
v.vertex.x -= rangeF * v.vertex.x*_Downward;
v.vertex = mul(rotate,v.vertex);
v.vertex += float4(-5,0,0,0);
o.pos = UnityObjectToClipPos(v.vertex);
o.uv = TRANSFORM_TEX(v.texcoord,_MainTex);
return o;
}
fixed4 frag(v2f i):COLOR
{
fixed4 color = tex2D(_MainTex,-i.uv);
return _Color * color;
}
ENDCG
}
pass
{
Cull Front
CGPROGRAM
#pragma vertex vert
#pragma fragment frag
#include "UnityCG.cginc"
struct v2f
{
float4 pos : POSITION;
float2 uv : TEXCOORD0;
};
fixed4 _Color;
float _Angle;
float _Warp;
float _Downward;
float _WarpPos;
sampler2D _SecTex;
float4 _MainTex_ST;
v2f vert(appdata_base v)
{
v2f o;
v.vertex += float4(5,0,0,0);
float s;
float c;
sincos(radians(-_Angle),s,c);
float4x4 rotate={
c,s,0,0,
-s,c,0,0,
0,0,1,0,
0,0,0,1};
float rangeF=saturate(1 - abs(90-_Angle)/90);
v.vertex.y += -_Warp*sin(v.vertex.x*0.4-_WarpPos* v.vertex.x)*rangeF;
v.vertex.x -= rangeF * v.vertex.x*_Downward;
v.vertex = mul(rotate,v.vertex);
v.vertex += float4(-5,0,0,0);
o.pos = UnityObjectToClipPos(v.vertex);
o.uv = TRANSFORM_TEX(v.texcoord,_MainTex);
return o;
}
fixed4 frag(v2f i):COLOR
{
float2 uv = i.uv;
uv.x = -uv.x;
fixed4 color = tex2D(_SecTex,-uv);
return _Color * color;
}
ENDCG
}
}
}
动态修改这个值就可以达到Plan的翻转
下面我们实现翻书效果
我们接下来要用DOTween,不明白DOTween可百度下来了解使用这里就不详解;
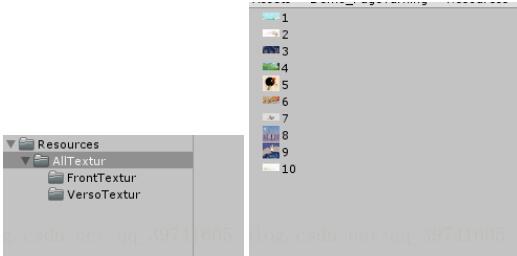
创建Resources文件夹 在内创建子文件夹FrontTextur(正面)和VersoTextur(反面)用来存放一本书的正反面图片 把自己准备的图片导入 为了方面动态加载我都用数字代替第几页
接下来我们创建一个Plan位置归零
创建材质球PageTurning2
然后再复制一个改名PageTurning3
把刚才创建的Plan添加材质球PageTurning3
然后将Plan作为预设拖入Resources。
删除Plan,然后重新创建一个Plan添加材质球PageTurning2。
接下来用下面代码实现翻书
using UnityEngine;
using DG.Tweening;

public class PageTurning : MonoBehaviour
{
  private Material m_Material;
  private int nowPage = 1; //最下面页码
  private int lastPage;   //已经翻过的
  private int allPage = 10;   //所有的页数
  private float Thickness = 0; //书的厚度

  void Start ()
  {
      m_Material = GetComponent<MeshRenderer>().material;
      Texture ShowFront =  Resources.Load("AllTextur/FrontTextur/" + nowPage.ToString(), typeof(Texture)) as Texture;
      Texture ShowVerso = Resources.Load("AllTextur/VersoTextur/" + nowPage.ToString(), typeof(Texture)) as Texture;
       m_Material.SetTexture("_MainTex", ShowFront);
       m_Material.SetTexture("_SecTex", ShowVerso);
  }

  public void Turning()
  {
      nowPage += 1;
      if (nowPage>10)   //设置阈值
      {
          nowPage = 1;
      }
      lastPage = nowPage - 1;
      if (lastPage < 1)
      {
          lastPage = allPage;
      }
      #region  翻动的页面

      Material m_Material2 = (Instantiate(Resources.Load("Plane"),new Vector3(0, Thickness+=0.001f, 0), Quaternion.identity) as GameObject).GetComponent<MeshRenderer>().material;

      m_Material2.SetFloat("_Angle", 0);      //DoTween做旋转动画
      m_Material2.DOFloat(180, "_Angle", 2);

      //m_Material2.name = "当前Material"+ lastPage;
      Texture ShowFrontLast = Resources.Load("AllTextur/FrontTextur/" + lastPage.ToString(), typeof(Texture)) as Texture;  //Resources加载正面图片
      Texture ShowVersoLast = Resources.Load("AllTextur/VersoTextur/" + lastPage.ToString(), typeof(Texture)) as Texture;  //Resources加载反面图片
      m_Material2.SetTexture("_MainTex", ShowFrontLast);   //更改材质的正面
      m_Material2.SetTexture("_SecTex", ShowVersoLast);    //更改材质球的反面

      #endregion

      Texture ShowFront = Resources.Load("AllTextur/FrontTextur/" + nowPage.ToString(), typeof(Texture)) as Texture;    //Resources加载正面图片
      Texture ShowVerso = Resources.Load("AllTextur/VersoTextur/" + nowPage.ToString(), typeof(Texture)) as Texture;   //Resources加载反面图片
      m_Material.SetTexture("_MainTex", ShowFront);       //更改材质求的正面
      m_Material.SetTexture("_SecTex", ShowVerso);       //更改材质球的反面
      //m_Material.name = "当前Material"+nowPage.ToString();


  }
}
把这个代码挂载到刚创建的Plan上
创建一个 UI的Button绑定脚本PageTurning上的 Turning方法。这样就实现了翻书的效果。
现在只做了往后翻书效果,如果想做往前翻的效果可把每次创建的Plan加载到集合中然后从集合中修改他们的材质球
m_Material.SetFloat("_Angle", value)
以上就是本文的全部内容,希望对大家的学习有所帮助,也希望大家多多支持编程教程。
本文为大家分享了Unity Shader实现3D翻页效果的具体代码,供大家参考,具体内容如下:效果图:原理:Shader顶点动画在顶点着色器进行对顶点Y值的偏移(使用了Sin函数模拟翻页时产生的弯曲 ...