Unity Shader实现3D翻页效果
本文为大家分享了Unity Shader实现3D翻页效果的具体代码,供大家参考,具体内容如下:
效果图:
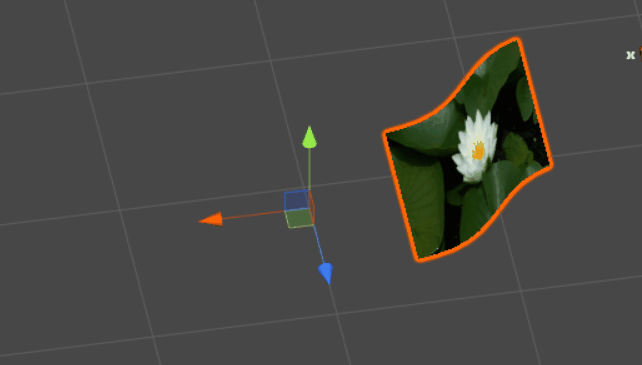
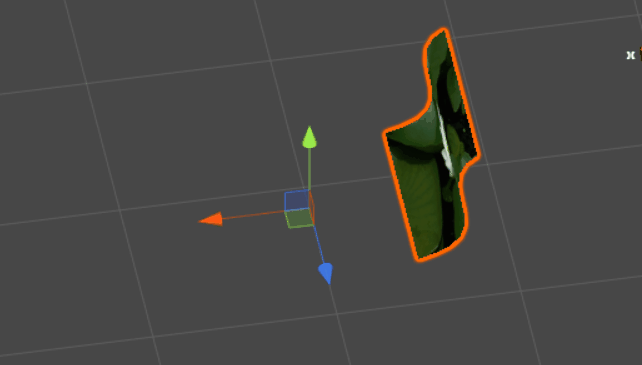
原理:Shader顶点动画
在顶点着色器进行对顶点Y值的偏移(使用了Sin函数模拟翻页时产生的弯曲),对顶点X值的偏移实现纸张在翻页时的收缩(一般是不用收缩),最后对顶点进行围绕Z轴旋转实现Plane翻页(Z轴是本例的旋转轴,请根据你具体情况修改,上面的两个偏移同理)。
Shader "Unlit/PaperTurnMilkShader"
{
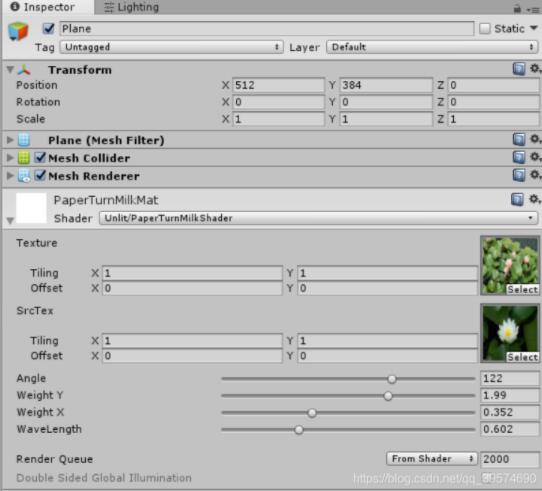
Properties
{
//正面图
_MainTex ("Texture", 2D) = "white" {}
//背面图
_SrcTex("SrcTex", 2D) = "white"{}
//旋转角度
_Angle("Angle", Range(0,180)) = 0
//弯曲程度
_WeightY("Weight Y", Range(0,3)) = 0.2
//收缩程度(值越大翻页时纸张越往内部靠拢)具体情况可测试
_WeightX("Weight X", Range(0,1)) = 0
//波长(值越大翻页时的弯曲次数越多)
_WaveLength("WaveLength", Range(0,2)) = 0.4
}
SubShader
{
//关闭批处理(因为修改了顶点位置)
Tags { "RenderType"="Opaque" "IgnoreProjector" = "True" "Queue" = "Geometry" "DisableBatching" = "True"}
LOD 100
//渲染正面
Pass
{
Cull Back
CGPROGRAM
#pragma vertex vert
#pragma fragment frag
#include "UnityCG.cginc"
struct appdata
{
float4 vertex : POSITION;
float2 uv : TEXCOORD0;
};
struct v2f
{
float2 uv : TEXCOORD0;
float4 vertex : SV_POSITION;
};
sampler2D _MainTex;
float4 _MainTex_ST;
float _Angle;
float _WeightY;
float _WeightX;
float _WaveLength;
v2f vert (appdata v)
{
v2f o;
//对顶点进行往X正方向偏移5个单位是为了离开旋转中心点,不然翻页时的旋转点是会在纸张中心进行围绕Z轴旋转(Z轴是纸张垂直线)
v.vertex += float4(5, 0, 0, 0);
float s;
float c;
//使用sincos获取 sin(弧度), cos(弧度) ,radians(角度)=弧度 ,_Angle前加负号是控制旋转方向,可根据DX是右手法则顺时针旋转,故应该逆向翻页要取负数
sincos(radians(-_Angle), s, c);
//围绕Z轴旋转变换矩阵
float4x4 rotate = {
c,s,0,0,
-s,c,0,0,
0,0,1,0,
0,0,0,1
};
//weight:_Angle在[0,90]变换区间时,weight会从0变为1;_Angle在[90,180]变换区间时,weight会从1变为0.
//weight可理解为是刚开始翻页(0°)到翻页到垂直时(90°)时,对其弯曲程度从小变大;(这个是对顶点Y值影响的结果)
//同理,收缩程度也是一样道理
float weight = 1 - abs(90 - _Angle) / 90;
v.vertex.y += sin(v.vertex.x * _WaveLength) * weight * _WeightY;
v.vertex.x -= v.vertex.x * weight * _WeightX;
//在进行偏移之后,再对顶点进行围绕Z轴旋转_Angle角度
v.vertex = mul(rotate, v.vertex);
//之后要偏移回来,因为我们已经做完了上面的旋转操作了
v.vertex -= float4(5, 0, 0, 0);
o.vertex = UnityObjectToClipPos(v.vertex);
o.uv = TRANSFORM_TEX(v.uv, _MainTex);
return o;
}
fixed4 frag (v2f i) : SV_Target
{
fixed4 col = tex2D(_MainTex, i.uv);
return col;
}
ENDCG
}
//渲染背面(和上方渲染正面PASS唯一的差别是:片元着色器的采样纹理改为_SrcTex(背面图)
Pass
{
Cull Front
CGPROGRAM
#pragma vertex vert
#pragma fragment frag
#include "UnityCG.cginc"
struct appdata
{
float4 vertex : POSITION;
float2 uv : TEXCOORD0;
};
struct v2f
{
float2 uv : TEXCOORD0;
float4 vertex : SV_POSITION;
};
sampler2D _SrcTex;
float4 _MainTex_ST;
float _Angle;
float _WeightY;
float _WeightX;
float _WaveLength;
v2f vert(appdata v)
{
v2f o;
v.vertex += float4(5, 0, 0, 0);
float s;
float c;
//使用sincos获取 sin(弧度), cos(弧度) ,radians(角度)=弧度
sincos(radians(-_Angle), s, c);
//围绕Z轴旋转变换矩阵
float4x4 rotate = {
c,s,0,0,
-s,c,0,0,
0,0,1,0,
0,0,0,1
};
float weight = 1 - abs(90 - _Angle) / 90;
v.vertex.y += sin(v.vertex.x * _WaveLength) * weight * _WeightY;
v.vertex.x -= v.vertex.x * weight * _WeightX;
v.vertex = mul(rotate, v.vertex);
v.vertex -= float4(5, 0, 0, 0);
o.vertex = UnityObjectToClipPos(v.vertex);
o.uv = TRANSFORM_TEX(v.uv, _MainTex);
return o;
}
fixed4 frag(v2f i) : SV_Target
{
fixed4 col = tex2D(_SrcTex, i.uv);
return col;
}
ENDCG
}
}
}
以上就是本文的全部内容,希望对大家的学习有所帮助,也希望大家多多支持编程教程。
本文为大家分享了Unity排行榜优化滚动效果的具体代码,供大家参考,具体内容如下:自己做的一个优化排行榜的功能,当有大量的数据需要在scroolRect中可以通过只夹在几个item循环利用便可以展示所需的内容; ...